
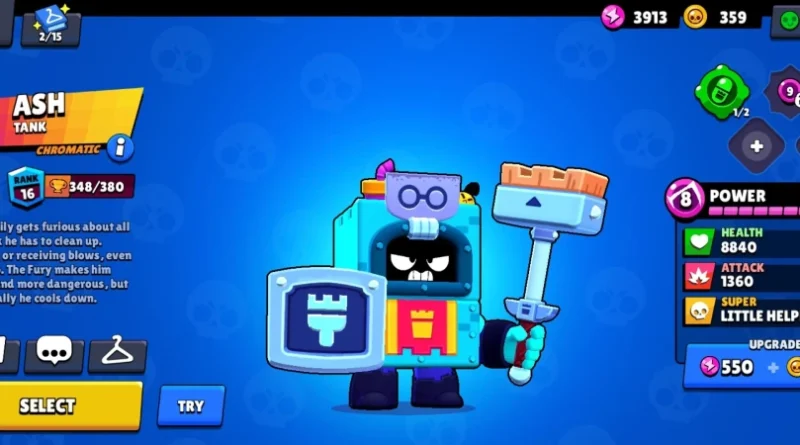
Ash Brawl Stars: Complete Guide, Best Build and Tips (2026)
Ash is a high-health Epic Tank whose whole game revolves around one meter: Rage. Current tracker data rates him as a solid mid-pack pick rather than a meta monster, with Noff.gg describing his recent performance as about average and his best results coming in Hot Zone, Gem Grab, and Brawl Ball. Your best build runs Chill Pill, First Bash, Damage Gear, and Super Charge Gear. Favor bush-heavy and choke-point maps, and manage your Rage bar carefully, since it drives everything he does. If you are still choosing a main from the full Brawl Stars brawler roster, this guide covers everything you need to get the most out of him.
Ash at a Glance

| Slot | Best Pick | Share of Noff.gg builds (185 tracked) |
|---|---|---|
| Gadget | Chill Pill | 75% |
| Star Power | First Bash | 64% |
| Gear 1 | Damage | 34% |
| Gear 2 | Super Charge | 26% |
His Rage bar fills whenever he deals or takes damage. The first filled segment adds 50% attack damage and raises his speed to 770, and a full bar doubles his damage and pushes his speed to 820. Use First Bash for aggressive early plays in one-on-one fights, and switch to Mad As Heck when matches turn into long, multi-tank brawls. The mistakes that hold most Ash players back are predictable: fighting on wide-open maps, wasting ammo, and letting Rage drain away between fights.
Supercell describes Ash as the grumpy worker with the thankless job of keeping Starr Park clean, who climbed into a trash can to protect himself from broken glass and rat bites. That temper is built straight into his kit: the more punishment he takes in battle, the more dangerous his offense becomes in return.
Who Is Ash in Brawl Stars?
Ash is a playable character in Supercell’s multiplayer brawler game, Brawl Stars. He first came to players through the Brawl Pass. Today he sits with the other Epic rarity brawlers and is unlocked on the Starr Road instead.
His design is easy to read once you see him in a match. He wears a trash can like armor, swings a broom for his main attack, and throws a box that bursts into robotic rats for his Super. What made him stand out at release, and still does, is his Rage bar, a second meter under his ammo that changes how strong he is from one moment to the next. That single mechanic is why searches like “how does Ash work” are so common: two Ash players with the same build can feel completely different depending on how well they manage it.
Is Ash Good in Brawl Stars Right Now?

Ash is a dependable situational pick, not a must-ban. Over the last 30 days Noff.gg shows him at a 54.7% win rate with a small 0.6% pick rate, and it rates his performance as about average. Ranked-only tracker data tells a slightly better story, placing him in A tier with a win rate near 54% across Brawl Ball, Gem Grab, Hot Zone, and Heist. The two numbers measure different player pools, but together they say the same thing: Ash wins more than his low pick rate suggests, mostly because the players who pick him know how to manage Rage. For context on how he compares with the full roster, our Brawl Stars tier list tracks rankings across patches, and the worst brawler guide explains what separates weaker picks from stronger ones.
His weaknesses are clear. He starts every fight at normal speed with modest damage, so high-mobility opponents, burst damage, and ranged poke can beat him before his Rage builds. Long-range marksmen such as Pierce and Piper can trade damage with him from a distance he simply cannot cover early in a fight.
He does have real situational value: strong zone control around objectives, high health, and good synergy with healers in 3v3 team comps. Brawlers like Moe occupy a similar damage-scaling close-range niche, and a tank built around ramping power like Ash rewards practice more than raw stats do. Compared with a starting brawler like Shelly, he asks more of you, but he pays off more in long objective fights.
How Ash’s Rage Works
Ash’s Rage bar sits at the core of everything he does. At max level his attack deals 1,600 damage with an empty bar and up to 3,200 at full Rage, a clean 100% increase. You build Rage by dealing and receiving damage, and his Super, gadgets, and Star Powers all speed that process up. At full Rage you are not just hitting harder, you are moving faster and, with Mad As Heck, reloading quicker too. His movement speed caps at 820 at full charge, the same speed tier that rush picks such as Max are known for, which makes a fully enraged Ash one of the fastest tanks in the game.
What Is Rage?
Rage is the foundation of Ash’s kit, dictating how hard he hits and how fast he moves. The bar fills when you deal or receive damage, then slowly drains once combat stops. Filling it completely takes damage equal to 125% of his max health, dealt or taken.
One filled segment boosts your attack damage by 50% and raises your movement speed from 720 to 770. A completely full bar doubles your damage output and maximizes your speed at 820, enabling an aggressive, high-damage playstyle that is difficult for enemies to handle. Because the damage jump between segments is large, opponents who misread your Rage often take trades they cannot win. Each landed attack charges the Rage bar by 17.4% per hit, according to the community wiki, which makes consistent aggression the fastest way to reach peak power.
Building Rage Effectively
Building Rage efficiently separates good Ash players from great ones. Your goal is to reach the first segment fast and then hold it. The cleanest opener is a full-ammo hit with First Bash equipped, which raises the Rage gained by 200% and can fill the first segment in a single strike. Follow with your Super: the robotic rats explode on contact and greatly increase Rage, especially when they hit squishy targets like Bonnie or Belle who cannot easily clear them.
If you run Rotten Banana instead of Chill Pill, it trades 10% of your health for an instant 40% Rage, which is useful when you need momentum right now. From there, chain normal attacks relentlessly, because every hit pushes the gauge higher and keeps the 820 movement speed and 100% damage bonus active. Don’t let your Rage decay: constant pressure keeps you deadly in every battle.
How Rage Powers His Whole Kit
Everything Ash does ties back to his Rage mechanic. His main attack, Clean-Up, is an angry broom smash that hits harder as Rage fills, and you also move faster, jumping from 720 speed at zero Rage to 820 at full, which lets you close gaps and reposition aggressively.
His Super, Little Helpers, releases robotic rats that chase enemies and explode on contact. His Hypercharge, Rat King, spawns five extra rats and adds 25% speed, 25% shield, and 5% damage while active, dramatically increasing your output in team fights. Our Hypercharge guide explains how the meter charges. His gadgets tie directly into Rage too: Rotten Banana trades 10% of your health for 40% Rage, while Chill Pill spends your Rage to heal, recovering up to 3,540 health at max level with a full bar. The First Bash star power further accelerates Rage buildup by raising the Rage gained from a full-ammo hit by 200%. The part most Ash players miss is that the offense side of Rage, higher damage and faster speed, is only half the equation. Chill Pill turns the same bar into a health reserve, and that defensive use is what makes him durable in long fights.
Best Ash Build in 2026

For Ash’s best build in 2026, run Chill Pill as your gadget, since it recovers up to 3,540 health at full Rage and appears in 75% of community builds on Noff.gg. Pair it with the First Bash star power (64% of builds), which raises the Rage gained from full-ammo hits by 200% and gives you a serious edge in sustained aggression. Round out the build with the Damage Gear and Super Charge Gear, which cover both low-health duels and Super-reliant play across most modes. The Damage Gear deals 15% extra damage when you drop below half health, which punishes opponents who try to finish you off up close.
Optimal Gadget and Star Power
The tracker numbers are lopsided on the gadget and closer on the Star Power. Chill Pill sits in 75% of builds against Rotten Banana’s 25%, because a heal of up to 3,540 health at full Rage is a fight-saving lifeline in any arena battle. First Bash leads Mad As Heck 64% to 36%: it gets Ash to his Rage threshold before opponents can react, while Mad As Heck’s reload bonus only pays off once Rage is already high. Together, Chill Pill and First Bash create a loop where fast Rage gain feeds a bigger heal, which is why the community keeps landing on this pairing.
Best Gear Choices
| Gear | Noff.gg Pick Rate | When to Use It |
|---|---|---|
| Damage | 34% | Default first slot |
| Super Charge (Epic) | 26% | Default second slot |
| Speed | 10% | Bush-heavy maps |
| Health | 10% | Long Showdown fights |
| Shield | 10% | Situational |
Super Charge earns the second slot by charging your Super 10% faster, which matters for a brawler whose rats feed his Rage. Swap Speed Gear in on bush-heavy maps where mobility matters more. Damage and Super Charge remain the core setup most competitive players run.
Chill Pill vs Rotten Banana: Which Gadget Wins?

When choosing between Ash’s two gadgets, Chill Pill wins by a wide margin. It converts your Rage meter directly into healing, keeping you alive through extended fights. Rotten Banana does the opposite: it costs health to generate Rage, which can create a dangerous cycle when you are already struggling.
Chill Pill dominates serious Ash builds for four connected reasons. It turns Rage into recovery, so aggression is rewarded instead of punished. It stacks naturally with Damage Gear, since you can fight at low health knowing a heal is ready. It keeps you in fights longer, which matters most in objective modes. And it removes the self-damage risk that Rotten Banana always carries. Rotten Banana is not useless, since an instant 40% Rage can win a sudden duel, but trading health for temporary Rage rarely pays off over a full match. Run Chill Pill if you want consistent, reliable performance.
First Bash vs Mad As Heck: Which Star Power Is Better?

Locking in Chill Pill sets the foundation, but your Star Power choice decides how fast Ash reaches his potential. First Bash raises the Rage gained from a full-ammo hit by 200%, which takes the community-reported 17.4% per hit up to about 52.2%. That early power jump lets you snowball before enemies react. Mad As Heck rewards sustained fights instead, granting up to 40% faster reload at max Rage.
| Feature | First Bash | Mad As Heck |
|---|---|---|
| Rage Ramp-Up | Very Fast | Normal |
| Reload Boost | None | Up to 40% |
| Noff.gg Pick Rate | 64% | 36% |
| Best Mode | 1v1s, general | Brawl Arena, tank-heavy fights |
| Skill Level | Beginner-friendly | Situational |
First Bash wins in most scenarios, especially one-on-one fights and early aggression. Mad As Heck shines once Rage is already flowing in prolonged, multi-tank matchups. Default to First Bash, but switch if you are consistently sitting at max Rage mid-match.
Best Gears for Ash: Damage, Super Charge, and What to Skip

Ash has six Super Rare Gears and one Epic Gear to choose from. Prioritize Damage Gear for its 15% boost below half health, which makes it your best tool for close trades. Super Charge Gear, his Epic Gear, pairs naturally with his playstyle by charging his Super 10% faster, so you deploy rats more often. Speed and Shield Gears are fine as map-specific swaps but rarely beat these two.
Damage Gear Benefits
Ash’s Damage Gear adds a 15% damage boost once his health drops below 50%, which makes it his most popular gear at 34% of tracked builds. When you are fighting at low HP, every hit counts, and this gear turns desperate moments into winning ones. It works with First Bash, because the low-health window is exactly when your Rage is usually highest. It works with Chill Pill, because you can push the damage window and still heal out. And it beats Shield Gear for most players, because it rewards aggressive, low-HP tank play rather than passive early survival. You don’t just survive with Ash; you punish people for thinking you’re finished.
Super Charge Gear Explained
Super Charge Gear gives Ash a 10% faster Super charge rate, letting you release his rats more often and keep your Rage meter climbing through back-to-back deployments. It pairs well with Hypercharge for quick power spikes and works best alongside First Bash and Chill Pill.
You get the most out of it on maps where frequent Super usage outweighs mobility needs. It is selected in 26% of user-created builds, second only to Damage Gear. It underperforms on bush-heavy maps where Speed Gear edges it out, and it trades durability for Super uptime in survival-focused matches. Skip it if direct engagements or map positioning matter more than sustained Rage output.
Gears To Skip
Not every gear deserves a slot. Vision Gear (4% of builds) and Gadget Cooldown Gear (6%) are the least used options for Ash, and both offer little to a brawler who already gets value from Chill Pill’s three charges per match. Health and Shield Gears (10% each) can work in long Showdown fights, but neither matches Damage or Super Charge for general play. Wasted gear slots cost you fights before the match even starts.
Best Game Modes for Ash

Ash performs best in objective modes where enemies have to come to him. Noff.gg names Gem Grab and Hot Zone as his strongest modes, with a 55.4% win rate in Hot Zone, and ranked tracker data shows him around 56.5% there as well. His high health and Rage make him a natural zone holder, because every enemy who contests the zone feeds his bar. If you are newer to these objectives, our guide to Brawl Stars game modes covers how each one is won.
In Gem Grab, bush-heavy maps let him control space aggressively. He thrives on maps like Undermine, which Noff.gg lists among his best, and Hard Rock Mine, where choke points force enemies into his range.
In Brawl Ball, his Rage mechanics suit close-range fights near the goal. Ranked tracker data puts him around 54% there, and he punishes opponents who cluster together and snowballs momentum quickly once he lands hits. Knockout is more mixed: Noff.gg shows a weaker result there, so treat it as a map-dependent pick rather than a default.
Ash is not a strong Showdown pick. Both solo and duo Showdown expose his short range and slow start before Rage builds, and tracker win rates in those modes trail his objective-mode numbers. In Showdown, brawlers with stronger early-game offense consistently outperform him. Across his best modes, prioritize bush-heavy map variants and activate Hypercharge when it is available.
How to Maximize Ash’s Rage and Damage Every Match

Maximizing Ash’s Rage meter separates good players from great ones, so you need to understand exactly how damage output scales with it. At max level, full Rage doubles your hit from 1,600 to 3,200, and that is the difference between winning and losing clutch fights.
Every match follows the same rhythm. Open with a full-ammo hit to trigger First Bash. Throw your Super into grouped enemies, because more rat explosions mean more damage and more Rage. Hold Chill Pill until your Rage is high, since a full bar heals up to 3,540 health and less Rage means a smaller heal. And remember that Damage Gear only kicks in below 50% health, which is exactly when a well-played Ash is usually at peak Rage.
Half Rage still adds 50% damage, around 2,400 per hit at max level, so don’t hesitate to engage mid-meter. Strategic Rage building consistently outperforms raw, unfocused aggression.
How to Play Ash: A Match Plan From Start to Finish
Knowing his numbers is one thing; knowing what to do with them in a live match is another. Ash plays in three clear phases, and most of his skills only work if you respect the order.
Early match: build, don’t chase. You spawn with an empty Rage bar, normal speed, and modest damage, so this is not the moment to sprint across open ground. Walk toward the nearest choke point or bush with all three ammo loaded, and wait for an enemy to come close enough for a full-ammo First Bash hit. If the enemy team opens with long-range poke, let your high health soak a little damage, because taking hits also fills Rage.
Mid match: hold the objective at full Rage. Once the first segment fills, you are faster and hit 50% harder, which is when Ash starts to control space. Stand on the gems, the zone, or the ball lane and make enemies come to you. Throw your rats into groups rather than single targets, keep one ammo in reserve for anyone who dives you, and pop Chill Pill only when the bar is full.
Late match: cash in your Rage. By the final minute your Rage should be high and your Super or Hypercharge close to ready. This is when to push: chase down low-health enemies at 820 speed, use Rat King to flood a zone or a goal, and trust Damage Gear to carry trades when your health dips below half.
Controls that help. Manual aim matters more for Ash than for most tanks, because his broom swing is easy to waste on auto-aim. Aim your Super manually too, so the rats land behind walls where enemies are hiding rather than on whoever is closest. If you play on a controller or a tablet, map the gadget button somewhere easy to reach, since Chill Pill timing is the skill that most often decides his fights.
Running the Numbers on Ash’s Rage
Tracker percentages tell you what people equip, not how fights play out, so it helps to do the arithmetic with his max-level values: 11,800 health and 1,600 base damage.
A full bar is a lot of damage. Filling Rage takes damage equal to 125% of his max health, about 14,750 points dealt or taken at max level. That is why Ash feels slow to start in a quiet lane and terrifying in a crowded zone fight: the more damage flying around him, the faster he peaks.
First Bash changes the opening math. At the community-reported 17.4% per hit, a normal Ash needs about six landed hits to fill the bar from empty. A full-ammo First Bash hit at roughly 52.2% covers about half the bar on its own, so two well-timed full-ammo hits are enough to fill it. In practice, that means you should walk into the first fight with all three ammo loaded rather than poking early.
Chill Pill rewards patience. At full Rage, the 3,540 heal is about 30% of his max health. Popped with less Rage, it returns less. Since it has three charges per match, the best habit is to treat it as a reset button at full bar, not a panic button at low bar.
A drill worth five minutes. In the Training Cave, open on a dummy with three loaded ammo to trigger First Bash, release your rats, keep swinging until the bar is full, then pop Chill Pill. Repeat until the sequence happens without thinking. That muscle memory matters more than any single gear choice, and it carries straight into how you handle the controls in a live match.
Ash Mistakes That Are Costing You Matches
Even the best Rage management means nothing if you make fundamental mistakes that leave you exposed. Without Rage, your damage is modest and your range is short, which makes you an easy target for aggressive brawlers like Bull, Edgar, Shelly, and Darryl, who will punish a slow start.
Poor positioning compounds the problem. Avoid wide-open maps that let ranged brawlers and throwers like Spike chip you from a distance, and don’t play passively the way you might with Nita early in a match. Head to choke points where grouped enemies let you charge Rage quickly.
Spamming ammo is another costly habit. You need reserves for mid and late fights, so stop unloading on every enemy you see. Auto-aim also tends to waste swings on mid and long-range targets, so switch to manual aiming for anything outside close range.
Finally, don’t waste your first hit. First Bash triggers on a full-ammo strike, so throwing that first swing away means losing your fastest route to Rage before a fight even develops. Standing in open space without wall cover at low Rage is the fastest way to feed kills to brawlers who can close the distance before your offense scales.
Ash Stats, Attack Values, and Super Breakdown
Understanding Ash’s numbers helps you make smarter decisions in every match. According to Noff.gg, he starts with 5,900 health and 800 attack damage at level 1, with normal range, fast reload, and normal movement speed. At max level those become 11,800 health and 1,600 damage. His broom attack scales in damage as his Rage bar fills, which makes holding choke points devastating. At full Rage you deal 100% bonus attack damage and move at 820, which makes him feel like a completely different brawler.
| Stat | Level 1 | Max Level |
|---|---|---|
| Health | 5,900 | 11,800 |
| Attack Damage (no Rage) | 800 | 1,600 |
| Attack Damage (full Rage) | 1,600 | 3,200 |
| Super Damage per Rat | 300 | 600 |
| Chill Pill Heal (full Rage) | 1,770 | 3,540 |
His Rage charges in several ways: roughly 17.4% per landed attack per community data, about 52.2% per full-ammo hit with First Bash, a large boost from each rat that explodes on an enemy, and steady gains from damage he takes. A completely full bar represents 125% of his max health in damage dealt or taken, so surviving punishment pays off.
His Super, Little Helpers, sends out five explosive robotic rats that chase enemies and explode on contact, dealing damage while charging your Rage. You are not just pressuring enemies; you are fueling your own power with every interaction. Otis is one of the more awkward matchups for this plan, because his silencing Super can stop Ash from using his abilities at the moment he wants to convert Rage into a Chill Pill heal.
Ash Counters and Matchups
Ash’s matchups follow one simple rule: anyone who keeps him from building Rage beats him, and anyone who feeds him Rage up close usually loses.
Who counters Ash. Long-range marksmen are the classic problem. Piper can trade damage from a distance he cannot close early in a fight, which is why she is often listed as a counter pick against him. Throwers who hide behind walls, such as Spike and Barley, are just as awkward, because Ash cannot reach them to build Rage. When you see these picks, stick to cover, approach through bushes, and save your rats for when they are pushed out of position.
Who Ash beats. Close-range brawlers who want to fight him head-on hand him the Rage he needs. Assassins like Mortis and Kenji are commonly cited as good matchups for Ash, because every hit they land fills his bar and his full-Rage swings punish them hard. The same logic applies to many tanks: a long brawl against El Primo or Frank pushes Ash to full Rage quickly, so play patiently through Frank’s stun and let the trade come to you.
Tank vs tank. Against sturdier tanks like Rosa, whose Super cuts the damage she takes, Mad As Heck becomes more attractive, because those fights last long enough for its reload bonus to matter. Compared with a fast melee tank like Bibi, Ash starts slower but gets stronger the longer a fight runs, so avoid quick skirmishes and drag her into extended trades.
Ash Skins, Synergies, and Upgrade Tips
Ash Skins and Customization
Ash has a growing collection of skins that play on his grumpy park-cleaner identity through seasonal and event-themed variants. Examples include Ninja Ash, Shinobi Ash, Krampus Ash, Pizza Oven Ash, Piñata Ash, Sandcastle Ash, and the True Gold and True Silver variants. Skins change the look of his broom attack, his rat Super, and his character model without changing damage values, Rage scaling, or gear mechanics. Skins come from the standard Brawl Stars paths: Gems in the shop, Brawl Pass seasonal tracks, and limited event windows.
Several of his skins also change how his rat Super looks, which makes the swarm visually distinct during team fights. That has practical value in crowded arena modes, where tracking which rats belong to which brawler matters.
Best Team Synergies for Ash
Ash’s team value comes from his ability to absorb damage and build Rage at the same time, creating a self-sustaining pressure cycle that benefits allies who can finish off the targets he weakens. Brawlers who deal steady damage from a distance complement his kit: while Ash pins an enemy with Rage-fueled close-range pressure, a ranged teammate chips the target from safety.
Healers are his best friends. Because Ash gains Rage while taking damage, a healer like Pam or Poco lets him keep building Rage without dropping into danger, which extends his aggressive window and delays the moment he has to spend Rage on a Chill Pill heal. Supports like Kit, who can latch onto a teammate, also pair well with a tank who wants to dive into the middle of a fight. The general rule for pairing Ash: one ranged damage dealer behind him, one healer or support beside him.
Upgrade Priority and Defense vs Offense
The defense-versus-offense question is straightforward at the gear level: Damage Gear wins over Shield Gear because Chill Pill already covers his defensive needs. Shield Gear adds passive protection but competes for a slot that Damage Gear uses more efficiently in almost every battle.
For power level upgrades, follow the unlock order the game gives you. Chill Pill becomes available at power level 7, Gear slots open at levels 8 and 10, First Bash arrives at level 9, and Rat King, his Hypercharge, completes the kit at level 11. That makes a sensible upgrade path Chill Pill, then Damage Gear, then First Bash, then Super Charge Gear. His health and damage scale meaningfully at each level, and the gap between power 7 and power 9 is often the deciding factor in a close Rage duel. Coins and Power Points from Starr Drops are the most reliable free-to-play path to max level.
Final Word on Ash
Ash rewards players who treat Rage as a resource rather than a bonus. Build him with Chill Pill, First Bash, Damage Gear, and Super Charge Gear, take him into Hot Zone, Gem Grab, and Brawl Ball, open every fight with a full-ammo hit, and save Chill Pill for a full bar. Avoid the common mistakes covered above and you will get consistent value out of him. He is not the easiest brawler to master, but once his Rage rhythm clicks, he is worth every trophy.
Ash FAQ: Quick Answers
How do you unlock Ash?
Ash originally came to players through the Brawl Pass. Today he is unlocked on the Starr Road with Credits or Gems like other Epic brawlers. Coins are only used to upgrade him after you have him.
What rarity is Ash?
Ash is an Epic Brawler. He is unlocked on the Starr Road for 925 Credits, the same price as other Epic brawlers.
Can you get Ash from the Trophy Road?
No. The Trophy Road hands out a set list of brawlers such as Nita and Barley, and Ash is not one of them. The Credits you earn there still help you unlock him on the Starr Road.
Is Ash good at high trophies?
He is harder to use at high trophy counts. Skilled opponents punish his short range and slow start with agile, burst-damage brawlers, so Ash works best there in objective modes like Hot Zone and Gem Grab rather than Showdown. Our guide to Brawl Stars trophy ranks explains how those brackets work.
How does Ash compare to other tanks?
Ash has 5,900 health and 800 attack damage at level 1, with normal movement speed that rises to 820 at full Rage. Noff.gg currently shows a 54.7% win rate with performance rated about average, so he is a solid tank that rewards Rage management rather than one of the strongest in the game.
