Byron Brawl Stars: Complete Guide, Best Build and Tips (2026)
Byron’s one of the most flexible supports in Brawl Stars because every shot either heals an ally or damages an enemy. The build most players settle into runs Injection and Shot In The Arm with Shield and Damage gears, and he’s at his best in Bounty, Knockout, Duo Showdown, and Brawl Ball, where his range lets him poke and heal without ever entering brawl range. Master his positioning and Hypercharge timing, and you’ll control matches in ways most players never expect.
Key Takeaways

Byron rewards patience more than mechanical skill. If you only take three things from this guide, take these:
- Default to Injection and Shot In The Arm with Shield and Damage gears, and swap in Malaise or Booster Shots only when the matchup specifically calls for it.
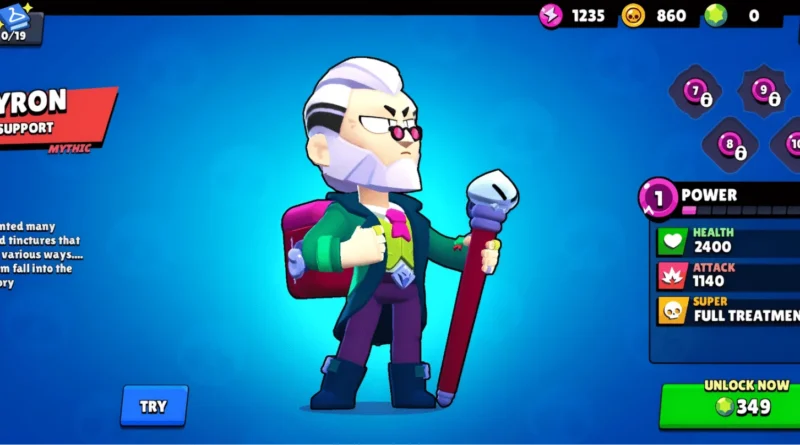
- His base attack, Careful Dose, does 380 damage or healing per hit at level 1, and his Super, Full Treatment, scales from 1,500 up to 3,000 at max level.
- His Hypercharge, Unstable Concoction, adds a flat +20% speed, +5% damage, and +5% shield the moment you activate it, on top of turning his Super into a spread of darts instead of one vial.
Is Byron Good in Brawl Stars Right Now?
Short answer: yes, but conditionally. Byron sits in the B-tier range on most current community tier lists, including FRVR’s Brawl Stars tier list, which groups him with Bea, Brock, and Mandy as brawlers who reward range but struggle once the enemy team closes the distance. That’s a fair summary of how he actually plays: strong when he can poke from a distance and control space, weak the moment a diver or assassin gets on top of him.
He’s not a brawler you pick up expecting to carry through mechanical skill alone. His value comes from patience, positioning, and knowing which of his two star powers and two gadgets a given match calls for. If you’re comfortable playing at range and retreating on cooldown, he’s a strong pick in Bounty, Knockout, Duo Showdown, and Brawl Ball. If you tend to overextend, he’ll punish that more than most supports will.
New to the brawler? Start with Injection and Shot In The Arm, the safer loadout covered below, and work up to situational swaps once you’re reading matchups more comfortably.
Why Byron Is One of Brawl Stars’ Most Versatile Supports

Byron stands out among Brawl Stars supports because he adapts to nearly every competitive mode instead of being locked into one job. He can sustain teammates through Hot Zone fights for zone control, and he holds up well in Bounty and Duo Showdown, where staying alive at range matters more than burst damage.
His gear flexibility is a big part of that. Equip Shield for survivability, switch to Damage when you need extra pressure below half health, or lean into Injection for piercing attacks that hit multiple targets through obstacles. His Malaise star power and Booster Shots gadget both give him real answers against enemy healers, which most long-range supports don’t have.
Against tanks, assassins, or coordinated compositions, Byron’s job stays the same: hold range, keep the poison and healing ticking, and don’t get caught out of position. His Booster Shots gadget turns his next attack into 3 piercing darts, each dealing 20% less damage but covering far more ground against grouped enemies.
Byron’s Attack, Super, and Hypercharge Explained

Byron’s kit comes down to three moving parts: his basic attack, his Super, and whichever star power you’ve equipped. His numbers scale hard by level, roughly doubling between level 1 and level 11, which matters more for Byron than for most brawlers since so much of his value is about stacking hits.
His basic attack, Careful Dose, fires a dart that poisons enemies or heals allies across three ticks, totaling 380 damage or healing per shot at level 1. Stacking all three ticks on the same teammate maximizes healing output.
His Super, Full Treatment, throws a vial over walls that simultaneously heals allies and damages enemies within its splash radius, dealing 1,500 at level 1 and scaling up to 3,000 at max level. It’s the go-to for finishing a low-health target or bailing yourself out under melee pressure.
| Mechanic | Effect | Value (Level 1 / Level 11) |
|---|---|---|
| Careful Dose | Damage / healing per shot | 380 |
| Full Treatment | AoE damage / healing | 1,500 / 3,000 |
| Malaise star power | Enemy healing reduction | 75% for 9 seconds |
Malaise cuts enemy healing to 25% effectiveness for 9 seconds after your Super lands, which is exactly why it’s such a hard counter to enemy support brawlers and forces early retreats when it connects. Byron’s passive healing kicks in automatically a few seconds after he takes damage, on top of everything else he’s doing for the team.
What Byron’s Hypercharge Actually Does to a Match

When you activate Byron’s Hypercharge, Unstable Concoction, his Super splits into a spread of darts fired from the impact point instead of landing as a single vial, turning one cast into a multi-target damage and healing hub.
You also get a flat +20% speed boost, +5% damage, and +5% shield, letting you reposition quickly while squeezing more value out of follow-up Supers. The health buff that landed on December 16, 2025, raised his level-1 health from 2,400 to 2,600, which gives him just enough extra survivability to stick around long enough for a Hypercharge cast instead of getting picked off first.
Unstable Concoction Explained
Byron’s Hypercharge turns his Super into an omnidirectional burst, firing multiple darts from the point of impact in a spread pattern similar to Spike’s main attack, at a projectile speed of 2,500, noticeably slower than his normal attack’s projectile speed of 4,000. That gap is part of why aiming Hypercharge into a cluster of enemies matters more than trying to snipe a single target with it.
Alongside the dart mechanic, you get the same standardized Hypercharge buffs every brawler gets on activation: +20% speed, +5% damage, +5% shield. Pair it with Malaise and you’re stacking a healing-reduction debuff on top of a burst that already punishes anyone caught near the landing point.
Maximizing Hypercharge Impact
Byron’s Hypercharge reshapes how his Super controls space. Instead of one vial impact, you’re detonating a burst that punishes every enemy within range at once, turning his Super into a zoning tool that’s strongest in Bounty and Knockout, the two modes where he already holds up best.
Time your Hypercharge for high-traffic zones so you’re hitting multiple targets, not one. Combine it with Booster Shots for extra dart coverage in a burst window, or lean on Shot In The Arm beforehand to make sure you survive to land the cast. Every activation should be pressuring more than one enemy. Byron’s base attack deals 380 damage or healing per dart at level 1, so a Hypercharge-boosted burst stacks on top of an already solid baseline rather than replacing it.
Best Byron Build in 2026

The build below is what most competitive Byron players default to, based on current gadget, star power, and gear win rates tracked by Brawl Time Ninja. Worth flagging up front: gadget and star power win rates on Byron currently sit within a point or two of each other, so the pick matters less than most guides make it sound. Gear choice and positioning move the needle more than loadout does.
For your gadget, Shot In The Arm is the safer default for most matchups. It heals roughly 75% of your max health in a single use, close to 3,900 health at level 11, which keeps you alive through trades that would otherwise end your run early. Save Booster Shots for close-range bursts where you expect all three darts to land.
For your star power, Injection is the everyday pick. It makes every third attack pierce, letting you hit or heal multiple targets without needing full ammo. Save Malaise for matches where the enemy team is out-healing your damage.
For gears, Shield and Damage remain the two worth running. Shield’s 900 consumable health regenerates during downtime, protecting you in early trades. Damage adds 15% extra output once you drop below half health.
Activate your Hypercharge in clustered fights rather than saving it for a 1v1. The +20% speed, +5% damage, and +5% shield pay off most when you’re spreading darts across several enemies at once, not chasing a single target.
Field Notes: What Changed After the Health Buff
The December 2025 health increase, 2,400 up to 2,600 at level 1, doesn’t sound like much on paper, but it shows up most in the first few seconds of an engagement, the window where Byron used to get burst down before his healing ever mattered.
In practice, that extra cushion means you can hold your poke position a beat longer instead of retreating the instant a diver closes distance, which is where a lot of Byron players were losing value even with the right build already equipped. It’s a small number with an outsized effect on how forgiving the brawler feels to play.
Booster Shots vs Shot In The Arm: Byron’s Best Gadget
The choice between Byron’s two gadgets comes down to whether you need burst utility or self-preservation in the moment.
Shot In The Arm heals 25% of your max health per second for 3 seconds, which works out to roughly 3,900 health at level 11, close to 75% of your total pool in a single use. That’s a genuine lifeline in a 1v1. Booster Shots triples your darts temporarily, but each one deals 20% less damage and 40% less healing, so it only pays off if all three connect.
| Gadget | Best Use Case |
|---|---|
| Shot In The Arm | Low-health escapes, 1v1 duels, solo play without a healer |
| Booster Shots | Close-range burst, lane suppression, finishing grouped enemies |
Unless you’re specifically running Injection for the piercing synergy, Shot In The Arm is the more consistent pick across most matchups. Default to it, and reach for Booster Shots only when you already know the fight calls for burst.
Injection vs Malaise: Which Star Power Should You Pick?

Your gadget shapes how you survive a fight. Your star power shapes how much value you put out across the whole match, and the two options here do genuinely different jobs, even though win rates on Brawl Time Ninja put them within a fraction of a percent of each other.
Injection makes every third attack pierce through targets, so you’re hitting or healing multiple brawlers at once. It’s the stronger everyday pick for ladder play and shines in Showdown, or anywhere you’re fighting around obstacles like Nita’s bear.
Malaise applies a 75% healing reduction to anyone hit by your Super for 9 seconds, a figure confirmed directly by the ability’s in-game text. That’s mostly irrelevant in a typical match, but against a comp built around healers like Pam or Poco, it’s close to a hard counter.
Run Injection by default, and switch to Malaise the moment you see two healers on the enemy side, not after they’ve already stabilized a fight.
The Gear Combo Byron Actually Needs

Byron’s gear setup is simple: Shield and Damage are the two that matter. Shield gives you 900 health regenerated over 10 seconds once you’re at full health, passive sustain that keeps you alive between engagements, which matters for a long-range brawler who can’t afford to retreat constantly.
Damage complements it. It grants 15% extra damage once you drop below 50% health, turning low-health duels into winnable situations instead of forced exits.
Beyond those two, everything else is situational. Gadget charge gear helps if you’re leaning heavily on Booster Shots. Speed gear pays off on bush-heavy maps where positioning matters more than raw output. Vision gear has niche value but rarely beats the Shield and Damage combo for general ranked play.
Which Game Modes Byron Dominates in 2026

Knowing where Byron thrives and where he struggles turns him from a situational pick into a consistent win condition. Per noff.gg’s current brawler stats, Byron’s strongest modes right now are Bounty, Knockout, Duo Showdown, and Brawl Ball, in roughly that order. Mode win rates shift with every balance patch and map rotation, so treat any single number here as a snapshot, not a permanent ranking, and check the tracker directly before a tournament or a big push.
Byron’s Best Modes
Byron does his best work in Bounty, Knockout, Duo Showdown, and Brawl Ball. His long-range dart attack rewards open Bounty maps where he can poke from a distance without getting caught out. In Knockout, his Super controls space while supporting allies through fast elimination rounds. In Duo Showdown, his dual healing and damage shots keep your partner alive while you pressure enemies in close quarters. Brawl Ball rewards his range and his ability to zone opponents away from the ball.
Modes To Avoid
Byron struggles in modes that punish slow healing and long cooldowns. His Shield gear regenerates over 10 seconds, which is unreliable under constant pressure, and Booster Shots deals 20% less damage and 40% less healing per dart, weakening him in team wipe scenarios.
Heist and Gem Grab tend to be his weakest modes, since both reward brawlers who can apply sustained close-range pressure or defend a single objective directly, which isn’t Byron’s job. His vial throw also struggles on wide-open maps where enemies can rush him freely before his healing has time to matter.
Best Team Comps to Run With Byron
Byron thrives when you pair him with brawlers that let him focus on applying poison and healing without getting overwhelmed himself. Each comp style plays out differently depending on the mode you’re queuing.
| Comp Type | Key Ally | Best Mode |
|---|---|---|
| Tank | Frank | Gem Grab |
| Damage Dealer | Colt | Hot Zone |
| Support | Nita | Heist |
| Control | Sprout | Bounty |
Frank absorbs frontline damage while Byron poisons freely from range. Colt’s Hypercharge pairs directly with Booster Shots, letting you hit multiple targets at once. Nita’s bear acts as a second frontline, and doubling up on Shield gear creates extended sustain in longer fights. Sprout walls off zones so Byron can safely land poison on slowed or rooted enemies. Injection fits any of these comps since its piercing utility works with every setup.
Byron Counters: Brawlers That Beat Him
Byron’s biggest weakness is close range. He has no way to fight back once an enemy is standing next to him, which makes fast, high-mobility assassins his hardest matchup.
Mortis closes distance through walls and punishes Byron before his healing ever has time to matter. Kit latches onto squishy backline brawlers and is nearly impossible to peel off once he’s attached. Fast divers in general force Byron to burn Shot In The Arm just to survive the opener, which puts him a step behind for the rest of the fight.
Byron also loses trades against anything that out-ranges or out-poisons him over time, since his own damage relies on stacking multiple ticks rather than landing one big hit. If you’re facing a comp built around dive, keep a teammate between yourself and the frontline at all times, and treat Shield gear as close to mandatory rather than optional.
How to Position Byron in Team Fights
Positioning correctly turns Byron from a passive healer into a constant threat. In three-lane formations, stay behind your frontline while your team splits across mid, left, and right lanes. Keep a cohesive horizontal line with your teammates, pushing forward and retreating together.
Use triangle distance positioning between yourself and your two teammates. That angle lets you heal both side-lane allies while keeping enemies within attack range at the same time.
Three positioning priorities worth following:
- Stay behind your frontline. Cast healing over time before your teammates take damage, not after.
- Form a triangle gap. Position so both teammates stay within healing range without clustering together.
- Mirror your team’s line. When one lane weakens, adjust your position to match that rotation instead of getting isolated.
Movement synchronization starts to feel automatic once you’ve built rhythm with a regular team.
Conclusion
You’ve got everything you need to play Byron at his highest level in 2026. From his best build to his ideal positioning, mastering him comes down to staying back, timing your Super, and keeping your team alive while chipping enemies down. He’s not forgiving if you’re out of position, but played right, Byron’s impact on a match is genuinely unmatched for a support brawler.
Frequently Asked Questions
How Much Health Does Byron Have at Maximum Level?
At max level (Power Level 11), Byron has 5,200 health. His level-1 base health was boosted from 2,400 to 2,600 in a balance update on December 16, 2025, improving his early-fight survivability, though he’s still one of the squishier supports in the game.
What Is Byron’s Rarity and How Do You Unlock Him?
Byron is a Mythic rarity brawler. You can unlock him through the Brawl Pass, Ranked Starr Drops, or ranked reward tracks, or buy him directly with gems when he’s available in the shop. Unlock costs shift with seasonal offers, so check in-game for the current price rather than assuming a fixed number.
Can Byron Heal Himself With His Own Basic Attacks?
No. Byron’s basic attacks only heal allies or damage enemies, never himself. To restore your own health, use his Super or his Shot In The Arm gadget instead.
How Long Does Byron’s Super Effect Last on Targets?
With Malaise equipped, the 75% healing reduction from Byron’s Super lasts 9 seconds, preventing affected enemies from recovering effectively for the whole window.
What Is Byron’s Attack Range Compared to Other Supports?
Byron’s attack range is 10 tiles, tying with Piper and beating out Barley (7.33 tiles) and Brock (9 tiles). That puts him among the longest-range supports in the game, and it’s a big part of why positioning, not mechanical skill, is what separates good Byron players from average ones.
